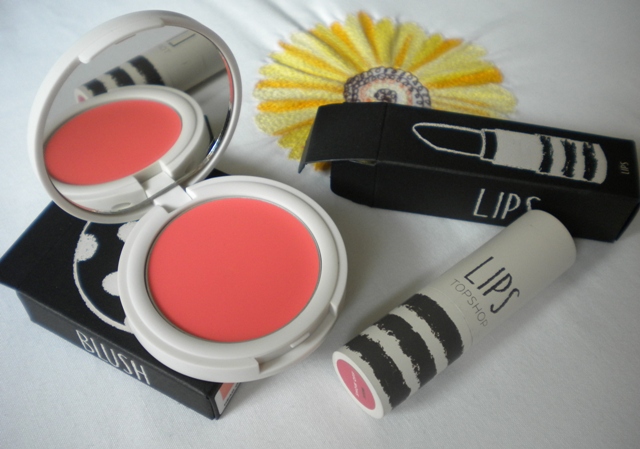
The gorgeous & talented Heather is holding a small giveaway which includes 2x Topshop products. I have heard great things about this brand so I'm excited for the chance to win!
enter here
Closes July 29
Monday, July 11, 2011
Sunday, July 10, 2011
Engagement Party Makeup: Glittery Gold & Black
So, the engagement party is all over, which I'm kinda sad but happy about it, mainly because it was so fun to do all the decorations (which took only 2 days haha- 1 hour to clean the majority up with about 10 people) but now the stress is over! Time to relax, even though it was a great night. The shed had never ever been that decorated before and without my future M.I.L and her friends' help it wouldn't have happened. Anyhoo...
I got my hair curled that afternoon, and when it came to my makeup I didn't really have anything planned! But I knew I wanted it to stand out, so I went for gold glitter as you will see in the pics.

Face- MAC Strobe Cream (after primer).
Nude by Natural Mineral Makeup. I used this coz I knew there would be lots of photos so I didn't want anything with SPF. However, the flash on my camera made everybody look really pale :@
Nars Orgasm blush- Just a hint for a nice glow
Eyes- TFSI
Slate JEP on outer corner & lower lashline only.
Bronze on most of the lid with black overlapping on the outer corner + lower lash line.
Skin colour blended into crease
Pixie Epoxy patted over bronze. Nyx Gold Glitter over that & a tiny bit used on the inner lash line.
Nyx Pearl Pigment in Nude for inner corner.
Cheap lashes from ebay- Cut in half. Criss-Cross on outer half and normal half ones just overlapping them, going in a bit more.
Lips- Nyx Rose l/l
Nyx Fig L/S
~More Pics~
I got my hair curled that afternoon, and when it came to my makeup I didn't really have anything planned! But I knew I wanted it to stand out, so I went for gold glitter as you will see in the pics.
![]() |
| Damn lashes in the 2nd pic, sorry!! |
![]() |
| Before getting changed- I took too many damn photos to choose from. some with eyes only, some before changed then heaps after changed. lol |

![]() |
| My hair from the back- taken earlier on in the day |
Nude by Natural Mineral Makeup. I used this coz I knew there would be lots of photos so I didn't want anything with SPF. However, the flash on my camera made everybody look really pale :@
Nars Orgasm blush- Just a hint for a nice glow
Eyes- TFSI
Slate JEP on outer corner & lower lashline only.
Bronze on most of the lid with black overlapping on the outer corner + lower lash line.
Skin colour blended into crease
Pixie Epoxy patted over bronze. Nyx Gold Glitter over that & a tiny bit used on the inner lash line.
Nyx Pearl Pigment in Nude for inner corner.
Cheap lashes from ebay- Cut in half. Criss-Cross on outer half and normal half ones just overlapping them, going in a bit more.
Lips- Nyx Rose l/l
Nyx Fig L/S
~More Pics~
![]() |
| In my dress- bought from Phuket. Cardi from Target. Earrings from Diva |
![]() |
| With the DF(dear fiance) at the party (lipstick worn off, had no time to reapply!) |
![]() |
| Tables not set up but you can see the gist of the decorations |
![]() |
| Gift Table with a photo board we had only made earlier that day! Was a last minute decision, we got the photos copied/ printed the night before & picked them up that day. |
![]() |
| With some friends :) |
![]() |
| A bit later on with the music up doing "The Creep" loll |
So yeah that's basically it, we had a great night with family & friends with plenty of food & wine :)
Thanks for looking!! <3
Thursday, July 7, 2011
My Hair routine
Hey bloggers :) I’ve been busy busy this past week, planning our engagement party & decorating, so I haven’t had too much time to spare although I wanted to share my hair routine, just coz I have been growing out my hair ever since I got it cut shoulder length, lol. I even bought extensions but haven’t worn them much… =/
![]() |
| As you can see i didn't properly style my hair, I just blow dried the majority of it with my fingers :) |
To wash- (also see here for hair washing tips)
I use a Tresemme Colour Protector conditioner & a Pantene colour therapy conditioner (my aunty gave me heaps so I haven’t bought any & wont need to in ages!)
I leave the conditioner in for a bout 2 minutes with a hair clip while I wash my face etc. Massage in while I’m rinsing it out. I pretty much always rinse with cold water (yep, even in winter!) after to close the hair cuticles which makes your hair shinier.
I pat/ squeeze with towel (my hair holds alottt of water so I have to squeeze for ages). After that I apply Wella Bio Touch Colour Protection conditioning spray to damp hair & brush with a comb (use combs only for wet hair!!)This makes my hair sooo soft!
I apply Moroccan oil mainly to the ends & some on top to stop frizz. You can stop there if you prefer to air dry, but my hair takes a day and a half to do that properly lol.
When I blow dry it I use a Tresemme heat protectant all over my hair. I blow dry on the 2nd warm hair setting with my hair dryer. If I don't want to style my hair I just use my fingers. Otherwise I will add some product in (whatever look I wanna achieve)
If styling with blow dryer I put my hair into sections & spray each with heat protector. I usually use a round brush that keeps my hair sleek but not completely straight.
Anyway I hope that was helpful to someone :)
I find that the Moroccan Oil makes the biggest difference to my hair with the shine :) I try not to use heat too much & if I blow dry I only do it no more than 2x a week.
Hope everyone has a good weekend!
Anyway I hope that was helpful to someone :)
I find that the Moroccan Oil makes the biggest difference to my hair with the shine :) I try not to use heat too much & if I blow dry I only do it no more than 2x a week.
Hope everyone has a good weekend!
Monday, July 4, 2011
Sigma f80 Giveaway thanks to Being Your Own Beauty
You beauty! haha :P Kristina @ Being your own beauty is holding a giveaway to win a sigma f80 brush! She also has a review on it! To enter & see the review click here.
Closes July 31st!
Closes July 31st!
Sunday, July 3, 2011
My Skin Revolution. Facial peel + Then & now pics
My skin has been on (what I like to call) a journey. So I have been collecting some photos for a while now, & looking back my skin has improved soo much that now I don't feel self-conscious when I go out of the house without makeup.
The 2 factors of this transformation would be going on the BCP which took a while to take effect on my skin, & getting a facial peel which has been the BAM that my skin needed. Lol =)
Before we get to the pics I want to talk a bit about this peel.
The name of this is 2B Bio Peel. You do 4 treatments (1 a week) which can only get done every 6 months (so that's 2x 4 treatments a year, hope I'm being confusing). I wouldn't want it anymore than that because I found it quite painful, and if you had done it too often I imagine it would be too damaging for your skin. It can also be done on your neck & decolletage if needed.
My fiance's mother has been doing my facial peel, which is $150 a session (prices will probably vary), however since she has been taking before & after pictures it has been a little gift ;)
I should mention that this peel works on different things for all ages- from acne, blackheads & scarring to pigmentation, wrinkles & sun damage. It actually injects little needles in your skin that keeps it working after the stuff has been taken off.
Anyway- before they apply the compound (while it is heating up) they will cleanse & prep your skin. & when the compound is applied they very gently rub it all over the skin (avoiding the eye area which is protected by Vaseline as well as the nostrils & mouth.) It stays on your skin for a few minutes depending on how sensitive your skin is & then it is wiped off. It doesn't take long for my skin to start tingling & slightly burn in some areas. Nothing is worse than when it gets itchy, though :P The pain is bearable & goes away after it is taken off. Although your face will feel prickly for sometime after. After that a mask is applied that soothes & cools down the skin, and that stays on for about 10-15 minutes. In this time you sleep :P
Once that is all done it takes about 40 mins from prep to end. It is important to wear sunscreen if you will be in the sun for as soon as it is over until the next 3-4 days. Also in that time your skin should peel (I found this wasn't too bad, it wasn't coming off in chunks or anything) & you know that it is working.
*phew- if you read all that, pat yourself on the back*
So now I am 3 weeks into part 2 of my facial & I wanted to share this in photos =)
Warning- Pic Heavy. You may not want to look too closely if pimples skeeve you out. You can also click on any pics to enlarge them. Apologies for the different sizing of the pics!
Before -All around the start/ middle of 2010
First Session Ever Of Peel -middle of November 2010
Pic on left is taken straight after first peel. Angry skin! Pic on left is from the week after ( I think)
So I didn't really get too many pictures from the first 4 weeks, or if I did I am not sure which ones are from where, lol, but you can see my skin is bad. The redness after each peel after this photo slowly gets better, & only lasts for about 1 hour. My skin gets quite itchy so I actually scratch it off, rather then let it peel =/
I also want to add that during the 1st few weeks of getting the peel done, some pimples may pop up because the peel is speeding up the process. So it may look like it's getting worse before it gets better.
Then & Now
Chin- Top pic is just before the peel. Bottom pic is now. Scars have faded heaps
Forehead- Just look how much more smoother it is now! ^.^
Right Cheek- you can just see the difference. 1st is before peels, 2nd is the 2nd week of part 2, & last pic is now (which is only 2 weeks after the middle pic)
Left Cheek- Not as bad as the right cheek, but a huge improvement.
Straight after part 2 week 2. Definitely not as red as what it used to get to!
With & Without Makeup. Week 3
Makeup complete- Hard to tell that my skin was flaming red! I also applied Aloe Vera after sun gel to my face to help soothe it before applying the primer.
Lastly- Now. No makeup
The lighting in the first pic makes it hard to see the little amount of scars I still have.
Comparison
mmm well I can honestly say, my skin has come along way!! No guarantees that it will stay perfect, but If I stick to my cleansing routine (which has also changed drastically since the beginning of time :P) & regular aspirin masks, I hope it goes well! I also still have one more session to go, usually I do them consecutively but due to being busy last week I couldn't.
Anyway, that's my somewhat personal skin journey. Thanks if you got through all of that!! Please let me know if you have any questions & I will try to answer them!
The 2 factors of this transformation would be going on the BCP which took a while to take effect on my skin, & getting a facial peel which has been the BAM that my skin needed. Lol =)
Before we get to the pics I want to talk a bit about this peel.
The name of this is 2B Bio Peel. You do 4 treatments (1 a week) which can only get done every 6 months (so that's 2x 4 treatments a year, hope I'm being confusing). I wouldn't want it anymore than that because I found it quite painful, and if you had done it too often I imagine it would be too damaging for your skin. It can also be done on your neck & decolletage if needed.
My fiance's mother has been doing my facial peel, which is $150 a session (prices will probably vary), however since she has been taking before & after pictures it has been a little gift ;)
I should mention that this peel works on different things for all ages- from acne, blackheads & scarring to pigmentation, wrinkles & sun damage. It actually injects little needles in your skin that keeps it working after the stuff has been taken off.
Anyway- before they apply the compound (while it is heating up) they will cleanse & prep your skin. & when the compound is applied they very gently rub it all over the skin (avoiding the eye area which is protected by Vaseline as well as the nostrils & mouth.) It stays on your skin for a few minutes depending on how sensitive your skin is & then it is wiped off. It doesn't take long for my skin to start tingling & slightly burn in some areas. Nothing is worse than when it gets itchy, though :P The pain is bearable & goes away after it is taken off. Although your face will feel prickly for sometime after. After that a mask is applied that soothes & cools down the skin, and that stays on for about 10-15 minutes. In this time you sleep :P
Once that is all done it takes about 40 mins from prep to end. It is important to wear sunscreen if you will be in the sun for as soon as it is over until the next 3-4 days. Also in that time your skin should peel (I found this wasn't too bad, it wasn't coming off in chunks or anything) & you know that it is working.
*phew- if you read all that, pat yourself on the back*
So now I am 3 weeks into part 2 of my facial & I wanted to share this in photos =)
Warning- Pic Heavy. You may not want to look too closely if pimples skeeve you out. You can also click on any pics to enlarge them. Apologies for the different sizing of the pics!
Before -All around the start/ middle of 2010
![]() |
| No makeup. Scarring, active pimples, quite red, blackheads that are hard to see. |
![]() |
| With makeup on- you can see the bumps. |
![]() | |||||
| Ignore the bad makeup!! You can clearly see how horrible my skin is here, and the unevenness of the texture. |
Pic on left is taken straight after first peel. Angry skin! Pic on left is from the week after ( I think)
So I didn't really get too many pictures from the first 4 weeks, or if I did I am not sure which ones are from where, lol, but you can see my skin is bad. The redness after each peel after this photo slowly gets better, & only lasts for about 1 hour. My skin gets quite itchy so I actually scratch it off, rather then let it peel =/
I also want to add that during the 1st few weeks of getting the peel done, some pimples may pop up because the peel is speeding up the process. So it may look like it's getting worse before it gets better.
Then & Now
Chin- Top pic is just before the peel. Bottom pic is now. Scars have faded heaps
Forehead- Just look how much more smoother it is now! ^.^
Right Cheek- you can just see the difference. 1st is before peels, 2nd is the 2nd week of part 2, & last pic is now (which is only 2 weeks after the middle pic)
Left Cheek- Not as bad as the right cheek, but a huge improvement.
Straight after part 2 week 2. Definitely not as red as what it used to get to!
With & Without Makeup. Week 3
I had to go into work that afternoon & I didn't want to go in with a red face. I used Nude By Nature MMU with no concealer underneath. You can see in the 2nd pic I did mostly half & you can see how amazing it covered up the redness!
Lastly- Now. No makeup
The lighting in the first pic makes it hard to see the little amount of scars I still have.
Comparison
mmm well I can honestly say, my skin has come along way!! No guarantees that it will stay perfect, but If I stick to my cleansing routine (which has also changed drastically since the beginning of time :P) & regular aspirin masks, I hope it goes well! I also still have one more session to go, usually I do them consecutively but due to being busy last week I couldn't.
![]() |
| Random- Yoghurt Face! LOL :P |
Saturday, July 2, 2011
Makeup Diary Amazing Giveaway!!
JC @ Makeup Diary is holding a very generous giveaway! With prizes including E.L.F, Nyx, Mac & Sigma, it is seriously one you wont want to miss out on!It is open internationally & closes 10th July. Click the picture above to enter!
Blog Awards =)
Hey beautiful people, so I am able to spend enough time to post again, this time to catch up on 2 blog awards.
A big thankyou to Mandy @ Hair and Makeup Overload for this award :)
& thanks to Hannah Michelle for the best blogger award
I will be doing the later.. since god knows how long it would take me to do the first ;)
A big thankyou to Mandy @ Hair and Makeup Overload for this award :)
& thanks to Hannah Michelle for the best blogger award
I will be doing the later.. since god knows how long it would take me to do the first ;)
The Rules...
1. Link back to the person who awarded this award to you
2. Share 7 Random things about yourself (I have already done this here)
3. Award 15 blogs4. Answer the following questions
Name your favourite colour -Pinkk!!
Name your favourite song - Always such a hard question since it changes all the time =/ My fave bands are Paramore & Flyleaf though, if it makes it any easier!
Name your favourite desert - I have the hugest sweet tooth, so it is extremely hard for me to choose, but if I had to, I would go with Lemon Meringue Pie. yummo!
What is pissing you off? - ATM- my sniffly nose :( & that I can never stop sneezing!
When your upset, you? - I quess I just cry... I find it helps me feel better. :)
Your favourite pet - :0 How dare you make me choose! lol
Mishka- Hard to see her when shes sleeping, but you can see how fluffy she is!! & My rabbit, Humpy (Don't ask bout that name haha)
Black or White? - hmmm def. black, most of my wardrobe is filled with black.
Your biggest fear? - hmm I would have to say spiders! eeek.
My best feature is -Idk... I guess I would say my hair/eyes :)
Everyday attitude - I take everyday as it comes, I try to be happy but that's not always the case!
What is perfection - That's a hard one.. perfection is many different things. Quote from a song: "Sometimes perfection can be, can be perfect hell"
Guilty pleasure -Hmm I have a few things. TV show: Jerseylicious. Food: Ferrero Rochers. Something I do: probably just laying in bed with music & a good book.. Especially when its cold out! oh & of course makeup!!
I am passing this award onto these blogs (in no order!), which I love reading!
<3
Subscribe to:
Posts (Atom)


.